
It’s a literal race against time – capturing the perfect photo at magic hour.
If you’re lucky, you are in the right place at the right time.
If you’re a pro, you get to the right place 10 minutes early. And if you’re an amateur, you get there an hour early without gloves and have to wait for the magical moments before the sun sets.
Fall is upon us, which means less weekend hiking trips for the summer adventurers out there. But, colder months mean clearer skies in some cases, and that means great opportunities for some stellar photos.
You’ve seen the photos that look like the stars are all shooting in a circular motion, right? The ones that look like paintings rather than photographs? Well those, I assure you, were not taken with a cell phone camera. Most were likely not even taken with a point and shoot camera (the smaller, compact version of the big ones). They were all probably taken with a single-lens reflex camera – or SLR.
Digital SLRs are becoming more and more popular to the average consumer, with lighter weight ones and more user-friendly modes. Choosing one, however, can be a daunting process.
It’s all pretty technical.
Frame rates, ISOs, megapixels, sensors, and then there’s also the lens that may or may not be included.
With advanced technology coming out, it’s actually quite possible for some point and shoot cameras (the ones with no detachable lens) to do the job of some of the beginner level DSLRs. But, you have to know what to look for.
If you want to shoot mainly landscape photos, with the ability to manually adjust your settings for those picturesque star trails photos, there are a few things you need to look for when choosing a camera for your adventure.
First, image stabilization. In all things camera-related, look for optical image stabilization as opposed to digital – the same rule applies to zoom.
Second, how many megapixels does the camera boast? (or how big can the photos be printed at a high resolution). For most landscape photography, anything less than 15 MP (megapixels) won’t get the job done properly.
The third most important aspect to a point and shoot camera is the maximum aperture. A high aperture setting (at least f/8.0) is ideal for landscape photography. This ensures everything in the frame will be in focus, no matter how far away it is – except planets obviously.
Aperture works like your eyes: The smaller the number, the wider the lens (or pupil) will open, the shallower the depth of field will be. The larger the number, the narrower the lens will open, and the longer the depth of field (and the less light it will let in).
Think about when you go to a dark movie theater. The moment you step outside, you are blinded by the sun and it takes a few moments to adjust.
In the movie, your pupils were wide open to take in as much light as possible. When you leave, your pupils haven’t adjusted, so they let in more light than necessary. Once they shrink back to normal, you can see just fine in the bright sun.
Aperture’s best friend is definitely the shutter speed. You have to be able to set these two independent of each other in order to achieve the results you want – especially on the star trails photos.
When you are shooting landscape photography, a higher aperture (also referred to as f-stop) is needed. This means there will be less light, so the shutter has to be open longer to let in enough light to properly expose the photograph you’re taking.
A slow shutter speed (at least 60 seconds) will let you capture some pretty amazing shots on your adventures.
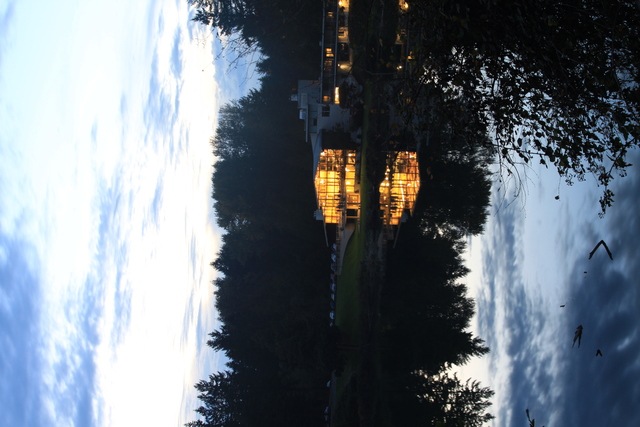
To put this in perspective, the shot above was taken with a DSLR with ISO 100, an aperture of f/8.0 and a shutter speed of 4 seconds. My DSLR can actually go up to f/29 and I can open the shutter for an infinite amount of time (using a remote control and “bulb” mode), but I wanted to simulate what a decent point and shoot can do. If you can find a point and shoot with bulb mode, that would be ideal for those star trails photos.
Feel free to experiment with the settings a lot. You may be surprised what works and what doesn’t.
Other equipment
Optical image stabilization will only get you so far. For anything longer than a shutter speed of 1/30 second, you need to have a tripod. Or, since you’ll be outside, a sturdy and semi-flat rock will do. Anything that won’t move and can hold your camera up will suffice. A tripod will just be more flexible. Rocks can get heavy.You don’t need an incredibly fancy tripod either. Spend your money on the camera itself, not the thing that holds it up. You can buy small tripods for under $10 or spend your life savings on one, it’s really up to you.
Patience is also something you need to come prepared with – especially shooting star trails photos. Some of them were shot with a shutter speed of 15 minutes. And that’s just one photo. Do you have the patience for that?
Other applications
There are some other fun results you can achieve with the same settings as the star photos. You can set up your camera on a tripod with a high aperture setting and a slow shutter speed (30 seconds or more), to make some interesting art with a flashlight. Spell out words, draw pictures, symbols, play tic-tac-toe, anything really.
Just face the camera, point the flashlight at it and start waving your arm like a crazy person. Works every time. Results may vary.
Location, location, location
You will want to find a place that has a low amount of light pollution (far away from city-centers).
If you live in the middle of the city, shooting from your rooftop will probably achieve pretty hazy results. Even some parks have 24-hour lights.
You can use this light pollution map to check where in your area will have the least amount of artificial light. You can also use a clear sky chart at www.cleardarksky.com to check which nights in the next 48 hours will have the greatest possibility to see some stars in your area.
Other features
Some cameras come with a lot of bells and whistles these days – built-in WiFi, HD video shooting, touch screen. All of those things are great, but don’t let them be the deciding factor when you’re choosing a camera. If you want it to take great photos, go for the specs first, not the frills.
Star trail photos step-by-step
Tripod, remote control, “bulb” mode on camera, low light pollution, higher elevation, clear dark sky.
Camera settings:
f/8.0 or more
At least 5 min. shutter speed or bulb mode and a remote control w/ locking mechanism
ISO 400 or less (the higher the ISO, the more grainy the end result will be)
Adjust your settings from here depending on your results. If the photo comes out completely black, hold the shutter open for 10 minutes. If it comes out hazy, you probably have too much light coming in from another source (*cough* your cell phone *cough*). If it’s too light, then turn down the ISO to 200 or less.
Tweak the settings however you want to get the result you’re looking for. No one photo needs to be taken with the same settings.
